How to use MailChimp on your WordPress site

If you’re a musician on tour, an author with a new book release, or a non-profit with a fundraising campaign, mailing lists allow you to create digital newsletters that you can send out to customers, clients or fans. Newsletters and other mailing lists can be a great way to build regular traffic to your website, create brand loyalty, and earn money.

The service MailChimp offers a popular and inexpensive way to build full-featured newsletters. MailChimp provides a lot of design options and keeps track of how well your email campaigns are doing.

In this post I will explain several different options for integrating a MailChimp signup form on your WordPress website to immediately capture email information from your site visitors. Below you will find tips will work for sites hosted on WordPress.com as well as sites hosted on other providers.

How to add a MailChimp signup form on a self-hosted WordPress site

Generally speaking, to add MailChimp to a WordPress site, you can do it one of two ways. The first way to do it is to create your form in MailChimp and then use the code provided by MailChimp. You can find that under the list name. Navigate to Signup Forms and then to Embedded Forms, as shown below:

signup form

From there, you can create a form that includes the fields you want, and then capture the embed code:

embedded form


You can paste that code into a Text Widget or in the Text view on a post or a page.

Using a MailChimp Plugin

Alternately, you can install a MailChimp plugin and create your signup box there. On this site, at least at the time of writing I’m using MailChimp for WordPress. This plugin requires you to create an API code on MailChimp that you need to enter into the plugin settings page. That will allow your mailing lists to show up within the plugin so you can create your subscription box and then enter a shortcode (a brief code enclosed in brackets [ ] ) into a Text Widget.

MailChimp on WordPress.com sites

When your site is hosted on WordPress.com rather than a separate hosting provider, you cannot upload plugins, and you cannot use any embed codes, making both of the previous processes impossible. However, there is a pretty easy workaround.

First, create your MailChimp list just like you would any other list. From there, go to your list and then to Signup Forms, but choose General Forms this time:

genforms

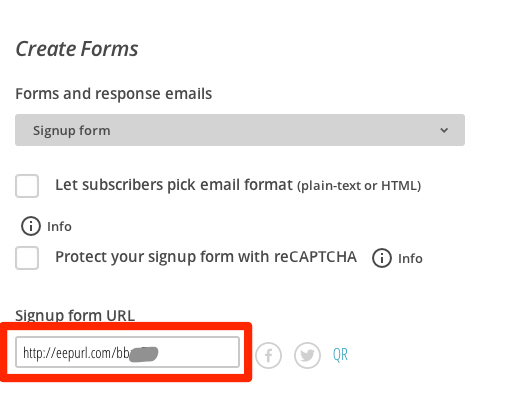
Create your form as you wish it to appear. You will need the Signup form URL:
createform

Find a good mailing list icon (I tried a Google Image Search for “mailing list icon” and found a number of them) or make your own. Go to your WordPress.com site and upload it to your site’s Media Library like any other image. Click on the image in your Media Library to open the Attachment Details page, and copy the URL from there:

medialibraryURL

On your WordPress.com site, go to Appearance > Widgets and create a new Image widget. Paste the URL from the media library, above, into the form for “Image URL”. Then copy the URL from MailChimp (the eepurl.com address, above) and paste it into “Link URL”. It should look something like this:

imagewidget

Once you’ve saved it, you will have a clickable button that will take users to a signup form for your MailChimp newsletter!


Setting up Google Analytics for WordPress

The following steps will explain how to create a new account with Google Analytics and connect it to your WordPress site so that you can begin collecting analytic data on who is visiting your site, which pages they view, and other data points.

1) Go to Google Analytics and log in with your Google/Gmail account.

2) Click on “Access Google Analytics” in the top right corner:

access GA

3) Sign up for Google Analytics by clicking on the button on the following page:

start using GA

4) Fill out the New Account information as indicated below:

Note that this account can be used for a number of websites (each having its own “property”), so you should choose your business name or your own name, rather than the website name.

GA new account

After agreeing to the Google Terms of Service, you will land on your new account’s Admin page. You will be able to get back to this page any time you need to by going to https://www.google.com/analytics/web/ while being logged into your Gmail/Google account.

5) Copy the Tracking ID (a code beginning with UA-). For most WordPress sites, you can disregard the tracking code snippet below the ID.

For example:

trackingID

6) Install and activate a Google Analytics plugin.

Two plugins that I recommend (you only need one):

7) Enter your Tracking ID into the plugin (or connect with Google through the plugin) according to the plugin instructions.

Once you have connected your site to Google Analytics, Google will start collecting data behind the scenes. When you’re ready to check out the data, you can view some basic data in the plugin (depending on which one you choose) or log into Google Analytics for a full view. Caveat: depending on the traffic to your site (and the age of your site) it may be weeks or months before you have meaningful data to analyze.

The different flavors of WordPress

Brass_scales_with_cupped_traysWhen you’re setting up your new WordPress site, the first decision you need to make is where your site should be hosted. The primary options are hosting your WordPress site on WordPress.com or alternately, on a different hosting provider using the free software available at WordPress.org (often referred to as “self-hosted”).

WordPress.com:

  • Unlimited free sites
  • Custom domains
  • Free support
  • No theme uploads, but they offer over 200 free & premium themes
  • No outside plugins, but popular plugin functionality built in
  • No upgrades or maintenance
  • Cannot run your own ads, but high-traffic sites can apply for the WordAds program
  • No bandwidth caps
  • Need upgrades to modify design/CSS, remove ads, upload your own audio and video, ecommerce

Self-hosted sites using WordPress.org software:

  • No limitations on advertising or content
  • Can modify theme files (and even the core WordPress software if desired)
  • Can upload own themes and plugins
  • No limitations on ecommerce
  • Must obtain own hosting and register domain
  • Bandwidth/space limitations for most hosting plans
  • Need to research & install plugins
  • Need to handle own security, backups
  • No free support

So which is right for you? If budget is your primary consideration, WordPress.com is the clear winner, in that you can get a site up and running for free. Even with the Premium upgrade, the hosting only sets you back $8.25/month. The support and maintenance by the staff at WordPress.com also make the site nearly worry-free. However, there are limitations since you cannot use your own themes or plugins and have only limited access to theme files. You also must keep the WordPress.com footer and abide by their Terms of Service. Self-hosting opens up a lot more options, notably the ability to upload your own theme and plugins. Furthermore, if you need advanced functionality (for example, membership options, paywalls, special landing pages), if you want to run your own ads, or you want a truly customized site design, then a self-hosted WordPress site is likely the better option for you.

How to create a new WordPress Admin account

When you need to give a new person access to the back end (Dashboard settings) of your WordPress site, the best practice is to create a new administrator of the site with a separate username and password. This protects your own account information and allows you to deactivate the new administrator account later if you no longer need it.

This can be done in just a few easy steps.

1. Log into your WordPress Dashboard, typically at http://www.yoursite.com/wp-admin (where you replace ‘yoursite’ with your actual domain address).

2. Navigate to “Users” in the left-hand column, and under that, select “Add New User”.

3. Complete the new user profile by assigning a username and password for the new user, as well as a role. For an administrative user, be sure to choose “Administrator.” Make sure you include the user’s correct and preferred email address.

4. Click on button to “Add new user” and the user will be added to your site, and an email will be automatically sent to the address you listed, informing the new user of their account (and prompting them to change their password if you didn’t send it to them).

admin user